
National Lab Balance Repair Center
Mettler - Toledo - Sartorius - Ohaus - Cahn - Precisa
Sauter - A&D - American Scientific - Denver Instrument
America's most experienced lab balance repair specialists
AE Display Board Exchange
The AE series have display boards that are easy to exchange. A replacement display board returns the unit to service with bright , clear numbers that will last for many more years.
To exchange the display, proceed as follows:
1. Unplug the instrument
2. Slide the glass doors open and remove the weighing pan.
3. Move the instrument on the work bench so that the front 3 inches ( 75mm) of the unit overhangs the edge of the bench. This allows the technician to see two screws on the underside of the instrument, near the front, which secure the cover over the display board. Remove those two screws.
CAUTION
: Do not tilt the whole instrument backwards, in order to make removing the screws easier. Doing so may dislodge the internal calibration weight, thus making calibration impossible or normal operation unstable.
4. With the screws removed , the metal cover over the display will be loose. Remove it.
5. The display board is visible with the cover removed. Notice that two screws secure the circuit board to the chassis. Remove those two screws, and the aluminum plate that is also secured by those screws.
6. Notice the ribbon cable that attaches to the board , towards the right rear of that board. Carefully pull on the connector plug (not on the cable itself) so that the plug separates from the board. The old board may now be removed, and replaced with the new one . Use great care in plugging and unplugging the cable.
7. Secure the new board with the aluminum plate and screws that were removed at step 5.
8. Replace the cover (removed at step 4) , and secure with screws (removed at step 3 ).
Mettler AE display board - tare bar replacement
If you are removing the tare bar from an old display board and installing it on a new board, you must be very careful not to damage the tare bar in the process. The tare bar is VERY easy to damage , so this article explains how to remove and replace the tare bar without ruining it.
The
tare bar is held to the etched circuit board with self-threading
screws. The damage to
the tare bar results when the torque of turning
the screws is exerted on the thin flexible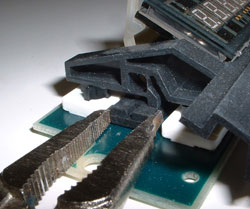 section of the tare bar.
This will occur if you hold the board and turn the screws, so don't do
that.
section of the tare bar.
This will occur if you hold the board and turn the screws, so don't do
that.
Instead, use a long-nose pliers or long-nose Vice Grip to hold the base of the tare bar by the black plastic immediately next to the surface of the circuit board. Use enough pressure on the pliers that you can pick up the board, but not so much that the black plastic is deformed in any way. You must pick up the board in such a way that you are holding the board only by that black plastic immediately next to the board surface . With the board so held, remove the screw from the opposite side of the circuit board . After one screw is removed, move the grip of the pliers to the remaining other end of the tare bar, and repeat the procedure.
When re-installing the tare bar to a new board, insert and engage both screws using gentle finger tightness initially. Then use the procedure above to hold the tare bar and finish-tighten the screws.
|
IES Corporation 2324 SE 11th Ave Portland, OR 97214 |
office@iescorp.com (800) 541-0852 fax (503) 235-2535 |